Deploying a Two-Tier Application Architecture on AWS
I am a cloud enthusiast with expertise in designing scalable and secure cloud solutions. I have hands-on experience in Docker for efficient containerization and application deployment. Passionate about simplifying complex technologies, I share my knowledge through informative blogs to inspire and educate others in the tech community.
Overview
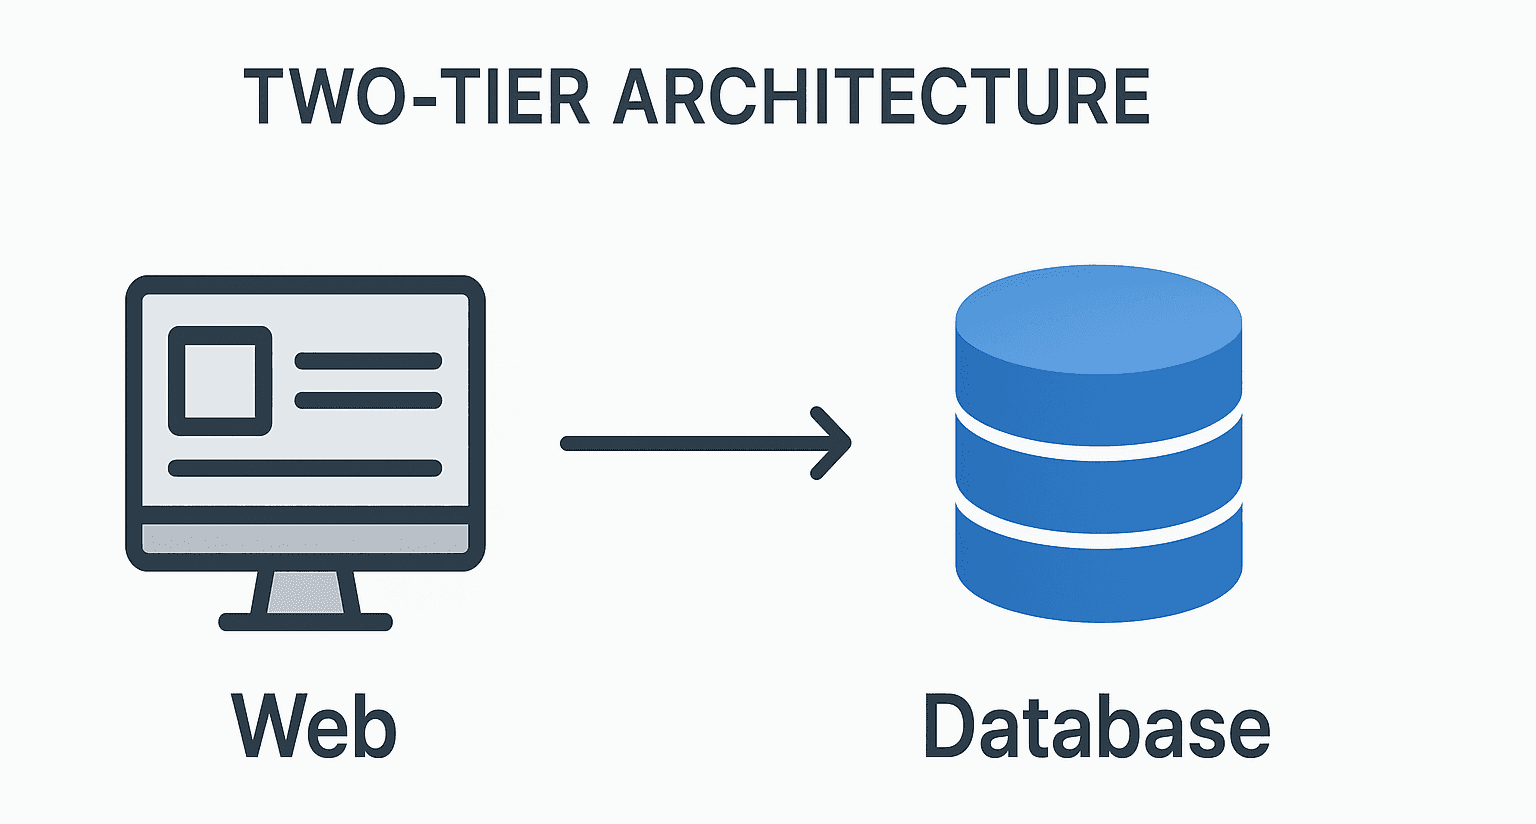
A two-tier application architecture is one of the most common patterns used to build modern web applications. It separates the application into two main layers:
Application Layer – Runs the frontend and backend logic, usually on a web server or application server.
Database Layer – Stores and manages data using a database server.
This separation makes the application easier to manage, scale, and secure compared to a single-tier setup. In this blog, we’ll walk through how to deploy a two-tier application on AWS.
Objectives
Our goal is to design and deploy a two-tier application on AWS consisting of:
An application layer running on Amazon EC2.
A database layer running on Amazon RDS.
We will use AWS networking services to securely connect the two layers.
Prerequisites
Before starting, make sure you have:
An active AWS account.
Basic knowledge of Linux commands.
Understanding of how EC2 and RDS work.
High-Level Architecture

Task 1 — Create a VPC and networking
Open AWS Management Console and choose the nearest region (e.g., ap-south-1 (Mumbai)).
Create a VPC
Services → VPC → Create VPC
Name:
VPC-EpicReadsIPv4 CIDR:
10.0.0.0/16Tenancy: Default
Add tags (Name =
VPC-EpicReads) → Create

Create subnets (across 2 Availability Zones for separation)
Create Public Subnet 1:
10.0.1.0/24(AZ: us‑east‑1a / ap‑south‑1a)Create Public Subnet 2:
10.0.1.0/24(AZ: us‑east‑1b / ap‑south‑1b)Create Private Subnet 1:
10.0.2.0/24(AZ: us‑east‑1a / ap‑south‑1a)Create Private Subnet 2:
10.0.3.0/24(AZ: us‑east‑1b / ap‑south‑1b)Tag the subnets with clear names (e.g.,
PublicSubnet1-EpicReads,PrivateSubnet1-EpicReads).

Create and attach an Internet Gateway (IGW)
VPC → Internet Gateways → Create IGW → Name it
IGW-EpicReads→ CreateActions → Attach to VPC → select
VPC-EpicReads

Create a Public Route Table and route 0.0.0.0/0 → IGW
VPC → Route Tables → Create Route Table (
RouteTable-Public-EpicReads) and pickVPC-EpicReadsEdit routes: add
0.0.0.0/0→ target =igw-xxxx(your IGW)Subnet Associations → Associate
PublicSubnet1andPublicSubnet2
(Optional) Create a NAT Gateway if you need outbound internet from private subnets (e.g., for patching or package downloads). Place NAT in a public subnet and create a private route table that points 0.0.0.0/0 to the NAT.
Network ACLs (optional but recommended for subnet‑level controls)
VPC → Network ACLs → Create NACL and attach to the VPC
Edit inbound/outbound rules as needed (allow HTTP/HTTPS/SSH where applicable).
Security Groups (instance‑level firewall)
EC2 → Security Groups → Create
SG-EpicReads(for application)Inbound: SSH (TCP 22) from your IP, HTTP (TCP 80) from 0.0.0.0/0
Outbound: allow all (or limit to RDS SG on TCP 3306)
Create EpicReads-DBSG (for RDS)
Inbound: MySQL/Aurora (TCP 3306) source:
SG-Web-EpicReads(Reference the web SG to allow only app instances to reach DB)Outbound: default (allow all) or restrict to app SG.

Task 2 — Launch EC2 instance (Application server)
Launch Instance
EC2 → Instances → Launch Instances
Name: EpicReads-WebServer
Choose AMI: Amazon Linux 2
Instance type:
t2.micro(free tier) or choose as requiredKey pair: select or create a key pair (download
.pem)Network: select
VPC-EpicReadsSubnet:
PublicSubnet1-EpicReadsAuto-assign Public IP: Enable
Security group:
SG-EpicReadsStorage: default is fine for demo
Launch instance
SSH into the EC2 instance (from your workstation)
Ensure
.pemhas correct permissions:chmod 400 key-pair.pemExample SSH command (Amazon Linux/AMI):
ssh -i key-pair.pem ec2-user@<public-ip>

- Update and install web server and PHP (Amazon Linux 2 )
sudo yum update -y
It is used to install the Apache web server on a Linux system.
sudo yum install -y httpd
Start and enable the Apache webserver.
sudo systemctl start httpd
sudo systemctl enable httpd
Install PHP and extensions required by WordPress.
sudo yum install -y php php-mysqlnd php-xml php-fpm
sudo systemctl restart httpd
Verify Apache is working
Open browser and navigate to:
http://<public-ip>→ you should see Apache default page.

Task 3 — Deploy WordPress
These commands assume you are on the EC2 instance and in
/var/www/html.
Download WordPress:
Change the directory to /var/www/html/
cd /var/www/html/Download latest WordPress package & Extract it
 sudo wget https://wordpress.org/latest.tar.gz
 sudo tar -xzvf latest.tar.gz
Copy the configuration file to wp-config.php file
sudo cp wp-config-sample.php wp-config.phpSet Permission for Wordpress file.
 sudo chown -R apache:apache /var/www/html/wordpress
 sudo chmod -R 755 /var/www/html/wordpress
Task 4 — Create the Database (RDS MySQL)
Create a DB Subnet Group
RDS → Subnet groups → Create DB subnet group
Name:
epicreads-subnetgroupVPC:
VPC-EpicReadsAdd the private subnets (
PrivateSubnet1,PrivateSubnet2)
Create RDS instance (MySQL)
RDS → Databases → Create database
Standard create → Engine: MySQL
Template: Free tier (or as required)
DB instance identifier:
wordpressMaster username: choose a username (store it securely)
Password: choose a strong password (store it securely)
Connectivity: choose
VPC-EpicReadsand DB subnet groupepicReads-subnetgroupPublic accessibility: No (keep DB in private subnet)
VPC security group: attach
EpicReads-DBSGAdditional configuration: initial DB name
wordpress(optional)Create DB
Edit DB security group inbound rules
EC2 Security → Security Groups → select
EpicReads-DBSGInbound rule: MySQL/Aurora (TCP 3306) Source: SG-EpicReads (so only app SG can reach DB)

Capture the RDS endpoint from the RDS Console. You will use this in the WordPress config.

Task 5 — Connect WordPress to RDS
On your EC2 instance, set an environment variable (for testing):
export MYSQL_HOST=<your-rds-endpoint>Connect to the WordPress Database
mysql --user=<your-username> --password=<your-password> wordpressAccess the wp-config.php
sudo vi wp-config.phpEdit the DB_NAME, DB_USER, DB_PASSWORD, DB_HOST.

Go to this WordPress Secret Key Generator https://api.wordpress.org/secret-key/1.1/salt/ and Replace the current script.

Allow 'W3TC' plugin write the configuration data into DB
define( 'W3TC_CONFIG_DATABASE', true );Install the PHP XML extension on your Linux system.
sudo yum install php-xml -yCopy all the files from wordpress folder to html folder & Change Owner.
 cd ..
 sudo cp -r wordpress/* /var/www/html
 sudo chown -R apache:apache /var/www/html
Finally, start hosting the Apache web server
 sudo systemctl start httpd.service
 sudo systemctl enable httpd.service
 sudo systemctl restart php-fpm
Task 6 — Finalize WordPress setup in browser
In your browser, open:
http://<ec2-public-ip>/wp-admin/.Choose language → Click continue.
Enter site title, admin username, password, and email → Install WordPress.
Login with the admin credentials and verify you can create posts and that they are stored in the RDS database.

Creating a test post.

Access our site via public Ip address.
http://<public-ip>
Conclusion
Deploying a two-tier application architecture on AWS provides a structured way to separate the application layer and the database layer. By setting up VPC, subnets, internet gateway, route tables, security groups, EC2 instances for the app, and RDS (or database server) for data storage, we can create a secure and scalable environment. This separation of concerns ensures better performance, easier management, and a strong foundation for running applications like WordPress on the cloud.